Monday, September 9, 2013
Four Ipad apps to help organize your classroom

Four Ipad apps to help organize your classroom


Are you looking for iPad apps to help organize your classroom? Here are four of my favorites!

Ipad apps to organize your classroom: Four great apps for any classroom, to help save time and sort information!


#1: Numbers
This is one of the first apps that the Apple salesman suggested to me after I bought my Ipad. You can view it by clicking on the picture below:


At $9.99, it is one of the pricier apps I've bought, but well worth it. It's a spreadsheet program, and although it's similar to Excel, it seems smoother and more powerful to me. I typed all of my students' names into class lists in Numbers, then added columns for singing solos and other assessments.

Every time a class comes into the room, I open their file in Numbers (I saved each grade level to the same spreadsheet, with different tabs for each class in that grade.) Then, when the students sing a solo, I click on the pop-up menu and choose their grade. Love it!

#2: Smart Seat: 
One of the things I like to do least as a teacher is to create seating charts. I just don't like doing it. So I was VERY excited to find this app!


 The app allows you to type in students' names (I was able to copy and paste the entire list right from Numbers instead of typing each student's name individually...hooray!) Then, the app assigns your students seats. You can change the seating arrangement so there are more or less students in a row and/or more or less rows. I took a few minutes in the first two lessons to take pictures of each student, so when I open up the app, I see all of the students' pictures and names. I knew most of my students already, but it's been very helpful for learning new students' names, and will be very helpful when my student teacher starts in January and she has to quickly learn hundreds of names! Another great feature: you can email each seating chart as a PDF, so you can print it out and add it to your grade book for subs, student teachers, or just for you. I found it very useful the other day, when I was giving an assessment with the "Unlock the Key Pattern" file I mentioned in the last blog entry. I marked the students who were absent right on the seating chart, then marked a minus next to the students who answered incorrectly with each question. At the end of the assessment, I then had data as to who answered all questions correctly (no minuses) and who struggled with identifying rhythmic patterns (several minuses.) Previously, I had just used class lists to mark this information down, so having the visual of the students' name AND their picture made the process go much quicker! I then marked that information into my class lists in Numbers. Oh, and I just read that the newest update will allow you to randomly put students into small groups. Very cool!

#3: Class Dojo
My future student teacher visited my first week of school, and told me about this app. I love it! 


This app allows you to copy and paste the class list from Numbers (again, so much easier than typing every students' name individually!). The app then randomly chooses an avatar for each child, which looks like this:

You do have to enter in the information on the website--not the app--but then it immediately syncs to the app. Then, during class, if you notice someone is participating very well, you could give them a thumbs up that specifies good participation. If a student is disruptive, you can mark that too. The great thing about this is that you can have specific information when doing your behavior and participation grades, instead of just guessing from memory. I'm excited about this quick, fun way to keep record of behavior and participation!

#4: Teacher Kit
I just found out about this app this weekend from my friend Karla, and although I probably won't be using it this year (as I have myself set up with the apps above) I wanted to mention it as another great app.
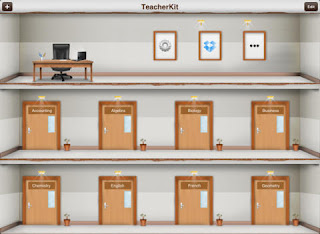

This app allows you to enter information for each class (each door is a different class) and grades, attendance, and behavior for each class. It also allows you to assign seats. If you want to have all of your information in one app, this would be a great choice! The graphics are great, and the ability to streamline is wonderful. It seems that you do have to enter each students' name individually, though (meaning you can't copy and paste from Numbers, not at least from what I can tell) and I'm not sure you can print the seating charts like you can with Smart Seat. I may just need to play around with it more, though!

What are your favorite apps for organization? Feel free to comment below, and happy teaching!

Music Manipulatives: Popsicle Sticks

Music Manipulatives: Popsicle Sticks

Manipulatives are one of my favorite things to use in the music classroom, so when I heard that Lindsay Jervis from Pursuit of Joyfulness was hosting a linky party about manipulatives, I thought I should contribute! I am writing today about using popsicle sticks for rhythm writing.

Popsicle stick rhythm manipulatives: Blog post includes directions for making and strategies for using!

After my first graders have reviewed the term "rhythm" and have worked with icons, and before they are working with the notation for ta and ti-ti, I have them work with "long" and "short-short,"  notated as ___ and _ _. This is a great intermediate step to getting them to hear 1 sound on a beat and 2 sounds on a beat. Popsicle sticks are a great way to practice this! I make a bag for each student, with 4 laminated hearts in each bag (which you can make with an Ellison die cut or Cricut), and then several regular popsicle sticks and several half-sized popsicle sticks. (As a side note, when I first started teaching, I sat and cut TONS of popsicle sticks with scissors. It was hard work, so I'm glad they now have half-sized sticks!) I just saw some at Hobby Lobby the other day, but you can also get them at Amazon by clicking on the picture below:

I first have students work with popsicle sticks on the board. I find that before individually using manipulatives, having students work with them in a whole group setting can be very beneficial. Magnetic tape, in my opinion, is one of the best inventions ever. Simply tear a piece of tape and place it on the back of a popsicle stick, so students can work with them on the board! You can find magnetic tape by clicking on the picture below:


When working with them in a whole group setting, students can write patterns from songs they know. When students have their own manipulatives, you can have students put out their four heartbeats, then tell them which pattern to write, such as "long long short-short long." This seems like a very easy step, in that you are telling students what to write, but some students really need this intermediary step before dictating completely on their own. It's also great for working on their musical memory!
Then, after telling them a few patterns, you can clap a pattern, have them echo, then have them encode that pattern. This is a great formative assessment; you can see how well students can hear the pattern, and how much more preparation you have to do before you present ta and ti-ti. You can have students spread out in the room, then circulate as you have them dictate. I mark down the students who are absent, then put a minus next to a student's name for each pattern they write incorrectly. If I see several minuses next to a name, I know they still really need individual help. If you are in Ohio and are working on SLO's, this would be a great activity to make sure you are growing each student a year, and really targeting those students who are struggling.
I have also used the popsicle sticks to present ta and ti-ti, by telling a story about how the wind came along and knocked the long so it was standing up tall! We give it the name "ta." Then another wind came along and knocked the shorts so they were standing up tall too...but they didn't have very good posture, so they have to put a book on top of their heads for better posture. (You can add another short popsicle stick to the top to bar the ti-ti's!)

Even better, you can use the popsicle sticks for other rhythms, like rest, ti-tika, etc. You could add a small chip for dotted rhythms!

Thanks Lindsay for hosting the manipulative party! Click the picture below to read her post as well as the posts of others.

Thursday, August 15, 2013
My music room set-up

My music room set-up

I have been so busy preparing my music classroom for the year, I thought I'd share some pictures of my room. I've added quite a few new things this year!

Here are a couple pictures of my room:


Here is one of my bulletin boards. This year, I'll be teaching flute, trumpet, trombone, and recorder, so I added the first fingerings for all of those. I have all of the sets in my TpT store (individual and bundled.)


My other bulletin board will correspond with our school-wide theme "Wild World Tour." Each grade level is focusing on one continent for the year, and for their musical program. When we learn a new song from a specific country/ continent, I can print out that song title and pin it to the board, showing where the song is from.

Here are a couple pictures of my word wall. It shows students how many musical terms they've learned throughout the years! You can find the word wall in my "Bird-Themed Classroom Set":


On Pinterest, I found this idea for creating a school mailbox (the original post is at http://confessionsofamusicteacher.blogspot.jp/2012/09/classroom-tour.html?m=1.) I loved the idea of a classroom mailbox, mostly just to keep me more organized! I found this mailbox at Wal-mart for $10, and I added the "air mail" sign to go with my bird theme. (If you've already bought the bird-themed classroom set, I've added the "air mail" sign; you can simply go to "my purchases" in TpT and re-download.)

 You'll notice the "flat pencils" and "sharp pencils" containers by the mailbox; you can download those for free at http://www.teacherspayteachers.com/Product/Flat-and-Sharp-Pencil-Signs-Freebie-796984.

I used my Cricut machine to create the classroom quote. I love that Cricut machine!

These hand sign/ solfa posters can be found in many of my "songs and activities" melodic sets. A colleague of mine gave me the idea to post "I can" statements by my bulletin boards and classroom signs as a way of reinforcing concepts. I tried to use the "I can" editable statements that come with all of my "I can" sets, but decided they were too small. Because of that, I've added an editable full-sized page to each of the "I can" sets. This one says "I can sing with solfa." (Oh, and the bird is a luggage tag from Thirty-One...I couldn't resist!)


This set was fun to make! The signs are categorized by instrument family, and can be found here: http://www.teacherspayteachers.com/Product/Instrument-Family-Printables-819814


This is a picture of part of my counter. The labels on the drawers are from Deanna Jump's "Organization Station," which is so worth the money, especially if you, like me, sometimes have a hard time getting your drawers organized!


I'm really excited about my musical symbol wall! The arrows are pointing from the musical symbol, to where the symbol is found in an actual piece of music (this example is Haydn's "Surprise Symphony.") You can purchase my "Musical Symbol Set" on TpT; it includes the visuals, the music, and the arrows.


My rules spell MUSIC, which makes them easy to remember! These rules can be found in my "Fabulous First Day" set. These rules are bird-themed, but the set comes with owl-themed, rockstar-themed, and plain.


I was really excited to find this hanging folder system on Pinterest! I often end up just throwing papers in my desk because my file folders are so tightly packed in my desk, they're hard to get into. This will make organizing much easier! This is called a Filetastic, and can be found at http://www.mardel.com/education/organization-and-storage/filetastics.aspx. I also bought the file folders through Mardel. The filetastic is hanging with the help of adhesive hooks.


Since I have a bird theme this year, I changed my "thinking chair" to correspond. When students need time to think (i.e. a time out), they go to the "fell out of the nest" chair, and  when they are ready, they go to the "ready to fly" chair. The "fell out of the nest" visual is in my behavior system in the Bird-Themed Classroom, and I have added "ready to fly" to the set; you can re-download the set to get the visual if you've already purchased it.


What ideas for classroom set-up are you excited about? Feel free to comment below!
Tuesday, August 6, 2013
Creating and Implementing a SLO

Creating and Implementing a SLO


I know it's been a while since I wrote, but I've been busy preparing for the school year! I will be posting pics of my music room soon, but besides preparing my music room and music lessons, I also just finished taking a class about student learning objectives, or SLO's. 

For those of you not in the state of Ohio, legislation was recently passed in which teacher evaluations will be based 50% on observation and 50% on the results of two SLO's. Student learning objectives are plans each teacher writes for a specific concept, estimating adequate yearly growth for each student. We give a pre-test, teach for several months, then give a post-test and compare the data. The geeky part of me is excited to have data to back up what I do in the music room, but I am also nervous the data won't support what I think is going on! It will be an interesting experience for sure!

Fortunately, my district hired a consultant just to give professional development about SLO's. I realize how lucky I am to have taken the class, so here are some insights:

Student Learning Objectives in the Music Classroom: Tips for implementing SLO's in your music room!
  • Be conservative: This was repeated to us a few times throughout the course. Although you may know that your students can achieve amazing things, since this is the first year, and you might not have baseline/ trend data to support your estimates, don't overestimate what your students can do. You can always raise the bar later!
  • Be specific: This really depends on your district, but in my district, they want us to just focus on one indicator/ concept, which I think is great. This makes it so much easier to assess and focus on. For example, instead of focusing on reading rhythm, reading melody, and singing, just focus on reading rhythm. Check with your district, though, because some districts are wanting their teachers to be more comprehensive.
  • Choose a concept new to your students: To really show the greatest amount of growth, choose a concept your students have not learned before. We are lucky as music teachers, because it is more common for students in our class to have no previous knowledge of a concept than in the grade-level classroom, as a student may have been taught multiplication by their parents! I'll give you an example. Last year, I took some baseline/ trend data to prepare for this year. I was teaching my students lines on the treble clef staff (you can read more about how I did this here: http://www.mrsmiraclesmusicroom.com/2013/04/a-new-way-of-teaching-notes-on-treble.html.) After I taught the students the letters in the musical alphabet (and before I showed them any note letters on the staff or taught any silly sentences) I had them complete a pre-test for the lines of the treble clef staff. This seems odd, because of course they weren't going to do all that well--but that's okay, because it will show how much the students learned from the beginning to the end! (I told the students some of them might know what to do because of piano lessons, but if they handed me a blank sheet because they had no idea, that was okay!) The pre-test was a mad minute, in which students had to label as many line notes as possible in sixty seconds, and 70 out of the 88 students answered only 5 or less because it was brand new to them; no students answered over 22 (out of 46) correctly. After a few months of practicing lines, I gave the post-test, which was the same mad minute, and this time, only three students out of 88 answered 5 or less, and 39 students answered over 22 correctly. This was a great amount of growth, but much of it was because unless they had piano lessons, they had never learned about labeling notes on the treble clef before they learned it in my class.
  • Collaborate!: This is the easiest way to write your SLO. I was lucky enough to have another music colleague in the class with me, which helped tremendously!
  • Choose three plans to begin with: This was my colleague Emily's idea. Throughout the course, we were actually able to write five SLO's, and she decided she would choose three to begin with, take the pre-test data, and then decide from the data which one she would eliminate. Since many of us don't have baseline/ trend data from previous years, we don't know how exactly our pre-test data will stack up, so I plan on choosing three as well.
Emily and I wrote five SLO's, for the following: recorder sound production, rhythmic audiation of ta and ti-ti (which can be adapted for later grades and concepts), melodic audiation of "do" (which can be used for later grades and concepts), lines for the treble clef staff, and identifying echo and call/response songs. I think I'm going to take pre-test data for recorder sound production, rhythmic audiation, and lines for the treble clef staff. For which topic are you planning on writing your SLO about? What other questions do you still have?

You can read more about SLO's by clicking on the image below (which is a visual of how SLO's fit into our evaluations):


Looking for more ways to track data in your classroom? Check out this set!


Have any advice for implementing SLO's? Feel free to comment below, and good luck!

SaveSave
Sunday, June 23, 2013
Grant Writing for the Music Classroom

Grant Writing for the Music Classroom


I've finished up the first week of teaching Kodaly Level I Pedagogy and Folk Song Research at DePaul University. It has been a great week full of lots of singing, playing, and reflective discussions!

As we go onto the second week, I'm excited about the special topics classes taught by my colleagues. On Monday and Tuesday, my friend and colleague Donna Gallo will be presenting strategies for creating music with Garage Band. I just know that after this session I'm going to be wishing I had a classroom set of Ipads! I'm posting the information below about writing grants as a reminder not only to me, but as information for any of the students in the course who are also interested, or any of you out there! 

I originally wrote this article several years ago for the MKMEA Bulletin, when I taught in Lancaster City Schools. I've received one other grant since writing the article below, from my district. I used the funds I received from that grant to purchase a classroom set of world drums, and am so happy I did! Many organizations offer grants; you just have to do some research and work, which is, of course, very much worth it!


Grant writing for the music classroom: Tips, links, and more for writing a grant to purchase instruments and technology for your music room!
In the fall of 2004, as I made plans for the year, I looked around at my old, worn-out, and broken instruments, and thought sadly that I should try to build my collection.  Unfortunately, though, my instrumental budget is typically $150 or less, and any monies I might receive from the PTO or music department would not be enough to truly give me the number or quality of instruments I'd like.

This is when I decided I should try writing a grant.

As I perused the different types of grants online, I found that many were program grants instead of capital grants.  With a capital grant, I'd be able to spend the money on a brand new set of Orff instruments, just for the sake of having new equipment.  A project grant, however, is given to support a specific set of activities, explicit objectives and a budgeted cost.  I pondered what type of project I could begin with a set of instruments, which objectives I might meet.  I looked over my year plans, my lessons, and my books, and decided there was one area in which instruments could be very beneficial: improvisation.  Although I'd been able to do some rhythmic and melodic improvisation in the classroom, I felt that instrumental improvisation, especially in the pentatonic scale, was perhaps the most accessible way to begin with my students.

 As I thought this over and came up with a plan of action, I became more excited about the improvisational skills my students might acquire, instead of just the access to the instruments. 

My sister is a grant-writer, so with her help, I wrote a grant to the Martha Holden Jennings Foundation.  In November of 2004, I received the grant.  In January of 2005, I received a set of seven Peripole-Bergerault instruments, twenty-eight hand drums, and two books which contained improvisational concepts and ideas: Orff Schulwerk: Applications by Brigitte Warner and Exploring Orff by Arvida Steen.  I'd like to share some grant-writing tips and procedures that I learned from my sister.

  1. The Wonderful World Wide Web.  By going to a search engine such as "google" and typing in search terms such as "music education" AND "grants," I was able to find a slew of sites that might be appropriate for my purposes.  These sites often have the application and guidelines online for your perusal. (See "web sites of interest" below.)
  2. Do your homework.  Once you've decided which grant you'd like to apply for, study as much as you can about that organization.  What kind of grants have they given out before?  What are the aims and goals of that organization?  Much can be learned just from browsing through their web site for a few minutes.
  3. What are their categories or areas of giving?  For the Martha Holden Jennings Foundation grant, I applied under "improving learning in the arts."  Not all grants are quite that clear, though, so you may need to put a lot of consideration into which area best describes your project.
  4. Be specific.  When writing the grant, the more specific you are, the better.  For example, if the organization asks for a timeline, give specific months.  When they ask for a plan of action, be as detailed as possible.
  5. Use "we" and "our," not "I" and "my."  This may be a no-brainer to some of you, but it wasn't to me!  My first draft included "my school" and "my grant."  You don't want to make it seem like the school and program are controlled by one person-- rather, you need to show that this is a collaborative effort (even if you're the only music teacher, and your principal doesn't know much about the grant!)
  6. Along those lines…show that you have support.  There is a delicate balance between showing that your school is in financial need, and showing that your school is willing to help out.  It could be as small as $10 of "in-kind matching" (your school will fork out $10 if the amount you're asking for exceeds the maximum the organization gives), or that your school will build you a bookcase for your new supplies.  For Martha Holden Jennings, a letter from the superintendent was required to show that he/she knows about the application, and will support the program in some way.
  7. What can the organization receive in return?  Organizations who give out grants do not do it simply for the sake of kindness.  That might be part of it, but they also do it because they'll receive something in return-- most often, advertising.  You might put their name on your web site, in your newsletter, and/or in your concert program.  
  8. Follow their guidelines to a "T."  Just as book publishers have slush piles, so do grant organizations.  Do exactly what they ask you to do-- don't give them an excuse to dismiss yours.

And once you receive the grant…
  1. Thank and recognize the organization.  First, upon receiving the grant, it is important to send a thank-you note or letter.  Then, you might recognize the board members of the organization by inviting them to performances, assemblies, or even a class.   They might not be able to come, but will appreciate the sentiment.  And if they can come, it's a wonderful way to show them how much you and your students benefited from the grant.
  2. Make sure to finish your final report.  A report stating how you met your objectives, spent the money, and so forth, is usually required. 

The biggest reward I received from the grant was not the instruments but the looks of joy on my students' faces when they performed for the school and for their parents.  I hope this will help you to tap into the endless resources available out there, so you can enjoy the benefits just as my students and I did!

Web sites of interest:
Martha Holden Jennings Foundation:     www.mhjf.org
Mr. Holland's Opus Foundation:           www.mhopus.org
Mockingbird Charitable Funding          www.mockingbirdfoundation.org/funding
The Ohio Arts Council                          www.oac.state.oh.us


Tuesday, June 11, 2013
Those darn squirrels!

Those darn squirrels!

Okay, I know, it has been a while since I blogged! But if you're like me, you've been enjoying the warm weather and hopefully, your first few days off! I've also been preparing to teach Kodaly Level I at DePaul starting this upcoming Monday, and even though I've taught Level I several times, there is still so much work to do!

Even with all that preparation, I've been enjoying some quality time with my daughters: Jenna, who is 9 years old, and Macy, who is 9 months old. I explained the other day to Jenna that their ages will never line up like that again...pretty special!

A couple weeks ago, Jenna, Macy, and I went to Jenna's favorite park. She calls it "the space park" because some of the play structures look futuristic, but it's actually called Scioto Audobon Park. If you are near Columbus, you should check it out sometime! I took a panoramic picture with my new phone while we were there to show how neat it is, but Blogger keeps inserting it into the blog sideways, so you'll just have to take my word for it!

What's even neater about the park is that there is a museum with an observatory, hands-on activities, and a very cool gift shop. The gift shop has several obscure picture books, and if you know me, you know how much I love picture books! I found one while I was there last called "Those Darn Squirrels" by Adam Rubin and Daniel Salmieri:

Those Darn Squirrels: A fun book for your music room, connected to "Let us chase the squirrel"!

I read the book with interest, realizing how perfect it would be for the song "Let us chase the squirrel," which I've listed below:

Let us chase the squirrel: A fun singing game for re! Blog post includes game directions and a picture book connection!


For the game, students are numbered off in 1’s, 2’s, and 3’s. The 1’s and 2’s make trees together, and the 3’s find a tree to stand underneath. If no children are left, the teacher becomes the squirrel in the middle. The students sing the song, and when the teacher claps, all squirrels, including the teacher, find a new tree. If one child is left, that student becomes the middle squirrel. If two children are left, they both go in the middle, but the teacher assigns a tree in which two squirrels can go underneath.

The story in "Those Darn Squirrels" is cute--a grumpy old man wants to paint the birds and puts up beautiful bird feeders, but the squirrels keep eating the bird feed. I thought it would be cute to have students sing "Let us chase the squirrel" when the old man tries to chase the squirrels away. I'm excited to use it next year when I teach "re"!

I hope you all enjoy the beginning of your summer! 

Saturday, May 25, 2013
Creating criteria for evaluating performances

Creating criteria for evaluating performances


As we approach the end of the school year, I often look at my grade-level indicators at what I wasn't able to cover, or what I wish I had delved into more. It would be wonderful to say we could get to everything, but with music only twice a week for thirty-five minutes, that can be quite the difficult task! One of the benefits about being a music teacher is that unlike classroom teachers, if we need to slow our pace down when we realize that students need more practice, we can without having to worry about how it might impact standardized tests. If we don't get to every single concept we had planned to, then we know where we left off and can teach them that concept the next year. (Unless, of course, you are a traveling music teacher and only have one grade level at a building!)

So this year, I looked at my fifth grade state of Ohio music indicators, and realized I hadn't really touched upon the indicator, "Develop and apply criteria for critiquing more complex performances of live and recorded music." I read the indicator over a few times, scratched my head, and thought, "Huh? How do I teach THAT?" I learned so much in my Kodaly training, and throughout all of the conferences and workshops I've attended, but I don't think I've ever been at a workshop or class that discussed how to teach that particular topic.

Creating criteria for musical performances: Great ideas for the elementary music classroom!


This was right after my fifth graders performed their program. While I was on jury duty, I had them watch the video of their program, and had them answer, in writing, questions about their performance, such as "What do you think you performed the best?" and "What do you think could have been improved?" They had performed a program I created called, "We are Ohio," with music from the many cultures represented at our school. I was very happy with their performance, but of course, it's always great for them to reflect upon what they could improve upon!

This indicator, though, goes deeper than just reflecting upon their own performances. So I decided to have them watch a different performance, this one of the group "Blast." This is a GREAT group that used to be the Star of Indiana (a group that I auditioned for on trumpet way back in college and almost toured with until I realized how much time in the summer it required... Very cool group!) You can find out more by clicking on the picture below:


 I have a DVD of the group (you can purchase them through West Music or many other music education companies), so I had my fifth grade students watch the DVD. Before we watched, I had them brainstorm questions they might ask themselves as they watch a performance in order to evaluate it. They came up with questions such as:
  • Do they play/ sing the right notes?
  • Do they have good posture?
  • Do they transition well? (This came directly from their rehearsals for their program...we talked a lot about transitions!)
  • Do they talk when they're not supposed to?
These were pretty basic questions, so I told them we'd watch a little of the performance by Blast, and as they were watching, they could think of more questions. After we watched a bit, they did in fact come up with more complex questions, such as:
  • Was the theme interesting?
  • Did the music show emotion?
  • Did the performers have passion?
  • Did the music represent the culture well?
One student asked, "Do they make us want to do it?" which after some further questioning, I realized really meant, "Do they inspire us to perform?" Wow...such a great question! The previous year, those same students had performed "The Drums of Noto Hanto," which was a program I created based on the book of the same name. The students had performed several taiko drumming pieces using bucket drums, and afterwards several teachers said to me, "I want to learn how to do that!" I shared this story with the students, telling them that they had inspired the teachers to perform (which they did...for the end of the year assembly, I taught many staff members a taiko drumming piece by Eric Paton and we performed it for the students. So much fun!)

After we came up with an extended list of questions, we applied those same questions to not only Blast's performance, but their recent school performance. It was so enlightening to see how they answered the questions (they thought Blast showed passion and emotion but weren't sure about themselves, but thought that their performance represented cultures better than Blast. Interesting!)

There are some indicators that take pretty much the whole year to teach, such as the indicators about reading, writing, and performing specific rhythms and solfa. We all know this is not an easy task and cannot be taught in one lesson! In my district, we call these "power standards," because they are very important and take lots of sequential work to teach well. This indicator I'm discussing is, I believe, not a power standard. Some standards/ indicators can be covered fairly quickly. The catch is, you may have to set aside a typical lesson of singing, reading, writing, etc. so that you can cover that material. The discussion I had with the students was so reflective...I think it was completely worth the time!

Have a wonderful week!

Thursday, April 25, 2013
A new way of teaching notes on the treble clef staff

A new way of teaching notes on the treble clef staff


Over the years, I've tried several different ways of teaching the notes on the treble clef staff. For a while, I used the silly sentences (like "Every Good Boy Does Fine" and "Elvis' Guitar Broke Down Friday" for the lines) and "FACE" for the spaces. Then one year I decided I'd show them that the treble clef is sometimes called the G clef because it crosses the G line four times. Then, they had to figure out that the next note was A, the note after that was B, etc. I thought maybe this was better than the silly sentences, but I quickly learned that although some kids get this, it really helps to have the silly sentences, at least at first! So I went back to that way of doing things. I began first getting them comfortable with the musical alphabet, then I would teach the lines/ silly sentences one day, the spaces the next, then I'd do a mad minute with them as a formative assessment. I'd take another day to do learning centers focused on notes on the treble clef staff, and then would do another mad minute as a summative assessment. During this process, my recorder players would transfer this to recorder, and my band students would transfer this to their band instruments. I've listed these ideas on this blog entry.

These strategies do work well, and the students improve quite a bit. But I still felt like maybe I could do more to help them, as there are always students who really struggle with note reading on the treble clef staff. I also wanted to take some baseline data so I could possibly write an SLO (Student Learning Objective) for this next year. So this year, I'm teaching the treble clef staff in a different way!

Teaching notes on the treble clef staff: A new way of teaching to ensure success in your music classroom!


After going through all of the musical alphabet activities, and showing them the staff with the treble clef, I told them the silly sentences, but I also showed them visuals. For example, for "Elvis' Guitar Broke Down Friday," I showed them:


 For "Every Good Boy Does Fine," I showed them:
 Then, I put a note on the third line, and they had to figure out it was a B, the second line they had to figure out was G, etc.

Then I tried something new--I immediately had them transfer that knowledge to instruments. My fourth graders were working on recorder, so I showed them this slide and had them figure out it was G, then had them play this pattern:


I had other patterns that used G, E, and B (no A's, because those are space notes and we haven't discussed them yet!) For my third graders who aren't playing recorder yet, we played a bunch of patterns on E, G, and B using barred instruments. I just had to love when one of my fourth graders yelled out, after we'd played a pattern looking at the treble clef staff, "We're ROCKIN' the recorder!" I think the fact that they immediately transferred it to instruments helped a bit of the disconnect I've seen in years past.

I thought about going right onto spaces after this, but then thought I'd do it differently this year. Perhaps if I stick with the lines for a while, I pondered, they'd do better in the long run. So we had another lesson in which we played patterns on the lines, and then I did a lines mad minute--with notes only on the lines. I was surprised with how much better they did with this than I've seen students do with mad minutes that have lines AND spaces. But I guess it shouldn't be that surprising...if they only have to worry about the lines, then they are just thinking about which line it's on. If they have lines AND spaces to worry about, then they have to think "Is this on a line or a space?" first, and then figure out which line or space, and then figure out if they'll use a silly sentence or the word "FACE." This is much more complicated!

Next week, I plan on doing learning centers, but we will ONLY focus on the lines. I'm going to work with a couple students in each group who were struggling with the mad minute, and then we'll do another lines mad minute in the next lesson as a summative assessment. Then we'll work on spaces, with the same process. Then I'll give the mad minute for lines AND spaces and see how they do! I'll post about this experiment with data from this year and data from last year as a comparison. 

If you're interested in the visuals and mad minutes I discussed above, as well as other activities and visuals, click the link below for my treble clef staff:


I also put together a similar package for bass clef:


What strategies for teaching treble clef work for you? Feel free to comment below!

Friday, March 8, 2013
Teaching meter/ time signature

Teaching meter/ time signature


For many years, I’ve been tweaking my process for teaching meter/ time signatures. I wish teaching this were just as easy as saying, “In 2/4, there are 2 beats in every measure, and in 4/4, there are 4 beats in every measure,” but as we all know, it is much more complicated than this. In this blog post, I'll detail some strategies that have worked well for me in teaching meter or time signature.

Teaching Meter/ Time Signature: Great ideas for teaching meter in your music classroom!

In order for students to understand time signature, they need to feel that the first beat of every measure is the strongest. They need to be able to track measures. They need to be able to figure out where the barlines should go (which is really a practice of rhythm, as they need to know how many beats each rhythm gets!) They need to learn how to perform basic conducting patterns. They need to understand why we use meter to divide music into measures. (Not to mention duple vs. triple meter. When should we teach ¾? 6/8?) This is a lot of information to learn! I’ve heard of some music teachers teaching 2-beat meter, or 2/4, to first graders, but in my experience, all of those barlines and measures and rhythms can be quite confusing for first graders. I like to just start having first graders feel strong beats and weak beats. Then, in second grade, we dive into 2-beat meter.

During my college years, I worked closely with the Dalcroze professor at my school (he gave me free pedagogy lessons, which was incredible. I owe so much to him!) I love using Dalcroze-inspired lessons when working with meter, because students need to physically be able to feel the meter—the strong beats and weak beats, the division of each—and physical activities are great for this! Tennis ball activities are a favorite of mine when preparing and practicing meter—having students bounce on the strong beat and catch on the weak beat, switching between different meters to see if students can hear the difference. Students can also sing a known song and bounce and catch the tennis balls as they sing.

I became even more interested in my teaching process for meter this year when I noticed my daughter—who does very well in music and in academics—struggle with the concept of tracking measures and barlines. She is one of the best readers in her class, yet something about meter wasn’t clicking, even though the students had previously learned 2-beat meter and were now working on 4-beat meter. So I went back to the drawing board and tried a few more ideas. For barlines, I started using popsicle sticks, like in the SMART board file below:


Something about using the popsicle sticks clicked with her, as well as a few other students. I also did learning centers for 4-beat meter. In one of the learning centers, students had to play rhythm patterns on drums.  The rhythm cards had two measures in 4-beat meter, and I asked the students to play in small groups, so that the first beat of each measure sounded stronger than the other beats. This seemed to solidify the idea that the first beat of every measure is the strongest.

I also had students work with puzzle pieces to create their own compositions. Each puzzle piece was like a measure and should have four beats on it, but they had to be careful—some of the pieces had less than 4 beats! This was a great way to solidify the understanding of a half note lasting for 2 beats! (Don’t you love arguments between students about how long a half note lasts for? I’ll take those arguments any day over who is first in line!) The puzzle pieces looked like this (and will be in an upcoming set):


Students also had to create their own composition with a glyph, by following the directions and choosing certain rhythms for each measure based on their likes. This was a good exercise in following directions, and gave us some neat compositions to play on instruments!

After several of these activities, I did a summative assessment, and am happy to report that she answered most of the questions correctly, and was able to compose 2 measures in 4-beat meter, putting the barlines in the correct place. Hooray! The rest of the class also did well, and I felt much better about moving onto the next concept (Ti-tika, here we come!)

I’ve compiled some activities, lessons, and visuals into “Songs and Activities to Teach 2-beat meter,” shown below.


Have a great weekend!
SaveSave

latest videos

ON YOUTUBE