Monday, September 23, 2013
More fun with fruit manipulatives!

More fun with fruit manipulatives!


Since today is Monday, it is once again time for Lindsay Jervis' manipulatives linky party!


Last week, I discussed fruit manipulatives. I've really loved using these, so this week, I wanted to mention a few more uses for them!

In my last blog entry about fruit manipulatives, I had students use the manipulatives to practice ti-tika. After putting together the activity, I realized I could take away some of the fruit to practice easier rhythms. For example, if I take the raspberries out of the bags, then students could use them to practice tika-tika, by having a watermelon in every pattern. Take out the watermelons and raspberries, and students in first grade can practice ta and ti-ti! If students are practicing tika-ti, you could add artificial tangerines or clementines in the bags! Click on the picture below to see fake tangerines on Amazon.


When using these fruit manipulatives with other rhythms, you could use them as a standalone writing activity, or connect them to other songs about fruit, such as "Apple Tree" and "Apples Peaches Pumpkin Pie." Another fun song that you could use for creating in 3-beat meter is "Oranges and Lemons," notated below.

Oranges and Lemons: a great singing game for 3/4! Blog post includes great ideas for using fruit manipulatives to practice rhythm!

To play the game, two students make an arch that the other students pass through as singing; one is secretly assigned as "orange" by the teacher with the other assigned as "lemon." On "Martin's," the students marking the arch drop their arms and catch a student. That student caught whispers "orange" or "lemon" to the teacher, and the teacher has him/her stand behind that student in the arch. The game continues until most or all students have been assigned to one side or the other, and then a tug of war ensues! The song is based on an English nursery rhyme (which you can read about here) and apparently the last verse is about chopping off someone's head. I think I may be leaving that verse out! :)

To use the manipulatives with the song, you could have students create a 6-beat pattern and say the fruit names, then rhythm names, but make sure the first beat of each three sounds strong, to help practice 3/4! You could use this as a B section, just as we did with "Red are strawberries" in the last blog entry.

This past weekend, I visited Fargo, ND and presented an assessment workshop for NPKC; the workshop was actually in Moorhead, MN, very close to Fargo. It was a fun time! After I presented about learning centers, I split the participants into four groups and had them try out the centers. At one of the centers, I combined fruit manipulatives with rhythm manipulatives, so that after they created the pattern, they had to figure out their rhythm and write it with cards. Here's an example below:

Fun with fruit manipulatives: Blog post includes great ideas for using fake fruit to practice rhythm in the elementary music room!

This is a great way to get students to connect the two types of manipulatives! I will write more about the rhythm manipulatives in another blog entry.

Thanks to Lindsay for the linky party, and have a great week!

Tuesday, September 17, 2013
Four great picture books for the music classroom

Four great picture books for the music classroom


Today, I'm blogging about four great picture books I'm using in my music classroom. Click on the pictures to see the books on Amazon (please note, these are affiliate links.)

Children's books in the music room: Four great books for the elementary music classroom!

#1: "This Land is Your Land" by Kathy Jakobsen and Woody Guthrie


Since it's Constitution Day today, I sang this to my third graders. Before I sang it, we discussed the holiday, how people sing patriotic music for patriotic holidays, and what the word "patriotic" means (it's surprising how many of them weren't sure!) The illustrations are beautiful, and there is some wonderful information about Woody Guthrie and about the song.

#2: How to Speak Moo by Deborah Fajerman


I learned about this book at a vocal exploration workshop by Lillie Feierabend and absolutely love it! It's great for grades K-2 (and even third) for vocal exploration. Each page has a different moo (high moo, low moo, soft moo, low moo, moo on trampoline, moo in tunnel, etc.) so after each page, I have students do that moo. At the end, there is a collage of all the different moos, and I have students choose their favorite and do that moo until I cut them off (which is good for teaching them to watch a conductor!) Lots of fun!

#3: "Llama Llama Red Pajama" by Anna Dewdney


This week, I'm going to use this book with my first graders after presenting "long" and "short-short." I was going to write up the entire process, but realized I already wrote a blog about it last year. You can read that blog entry here.

#4: "Three Billy Goats Gruff" by Parragon Books

The book I've actually been using is certainly out of print (and falling apart!) so I think I'm going to buy this one for next year's Kindergarteners. Same story, but with cuter pictures! For this book, I first read the story to students and have them do vocal exploration. For the little goat, they speak "trip, trap, trip, trap" in their high squeaky voices, for the middle-sized goat they use their speaking voices, and for the large goat and the troll they use their low grumbly voices. In the next lesson, I assigned instruments: glockenspiels for the river, triangles for the small goat going over the river, rhythm sticks for the middle-sized goat, and hand drums for the large goat. We discuss how to play each instrument, and then they only play their instrument on their part. It was a fun way to introduce the instruments and how to play them, as well as improve their listening skills!

Looking for more picture books for the music classroom? Check out this post about singalong books, and check out my Pinterest board about children's books:


Happy reading, and happy teaching!
Monday, September 16, 2013
Fun with Fruit Manipulatives!

Fun with Fruit Manipulatives!

Since it's Monday, it's time for Monday Music Manipulatives, a linky party with Lindsay Jervis' blog, to blog about fruit manipulatives!

This past week, I tried something brand new in my music classroom, and I'm very excited to share it!

This idea started with a SMART board file I made with fruit that looks like this:


The idea with this file is that students clap each fruit's name (like pineapple, kiwi, peach, etc.) and then figure out which rhythm each fruit is. For the pattern in the picture above, the fruit pattern would be "pineapple kiwi peach pear," and the rhythm would be "ti-tika ti-ti ta ta."

I included this SMART board file in my "Songs and Activities to Teach Ti-Tika," but you could easily make it yourself by finding pictures of fruit, inserting them into a SMART notebook file, infinitely cloning them, and then making a table with one column and four rows.

When we used this SMART board file in class, it initially wasn't attached to any song; I just used it with my fourth and fifth graders as a way to practice ti-tika (my students are a bit behind because I've only had them since first and second grade, and they weren't quite where I wanted them to be at that point.) A few of the students got the chance to come up and create whatever pattern they wanted, and then we said it with fruit names, and then with rhythm syllables. That was going to be the end of that...but then they really seemed to love it, and they were disappointed we were done...so I brainstormed!

I have been trying to provide my students with more chances for creativity (especially after attending Jay Broeker's amazing workshop for TRIKE about improvisation and creativity!) I thought of the song "Red are Strawberries," as it it about fruit, AND it has a ti-tika. It is a Finnish folk song, and is notated below:


I first had the students sing the song (many of my fourth and fifth graders know it, as we sang it in choir last year), then we would do a fruit pattern as a B section, first reading the fruit names, followed immediately by the rhythm names. Then we'd sing again, and I would quickly motion for another student to come up and change the pattern. Most of the students could create another pattern before we were done singing the song again, and then we'd say the new pattern. I did this several times, changing students who were creating patterns.

In the next class, we used fruit manipulatives. I found some great artificial fruit on Amazon. You can see what I bought by clicking on the pictures below:


After reviewing the activity on the SMART board a few times, I split the students up into 6 groups of 4 (you can do whatever works for your class sizes!) I used the SMART Seat App I wrote about in this blog post to create the groups. Each group received one bag of fruit, and had to decide with each other what their four-beat pattern would be, but there had to be at least one raspberry (as we are practicing ti-tika.) Here is a pattern from one of the groups:


Their pattern was "lemon watermelon raspberry kiwi/ ti-ti tika-tika ti-tika ti-ti." Once all groups have created their pattern, we all sing, then we all say our patterns. I found a hand drum very helpful for this to keep them all together! Then we sing again. Even better...the kids scrambled to create a new pattern for the next time--something I hadn't even thought to do!

I plan on using this as an assessment in learning centers in a few lessons. I'll be anchored at a center, and there, students have to individually create patterns, then say their pattern to a steady beat with the correct rhythm syllables. I'll post about how that goes!
Thanks again to Lindsay for her manipulatives linky party! Click the picture below to read the other posts about manipulatives!


Friday, September 13, 2013
Five Favorite Pins of September

Five Favorite Pins of September

Today, I'm trying my first linky party; I'm blogging about my five favorite pins this month!

Five favorite music education pins of September, including a fun song, learning center buttons, and more!

I love Pinterest...I think it's such a wonderful way to share ideas (especially teaching ideas!) Here are my five favorite pins for this month:

#1: Bim Bum You Tube Video:


Maybe these girls made this video to share with other kids their age, but they are doing such a service to music teachers, especially those who want to collect folk songs and teach through technology! I transcribed the music below (in a more comfortable key for singing with children):


The song could be used for fa and tika-ti, and I love that the girls break it down into small steps. You could put the You Tube video on and have them learn by watching them. I can see kids really loving this song! These girls also made several other videos with other songs...I'm excited to check those out as well!

#2: Patti Anderson's Blog
I'm always excited to find other music teacher blogs! I met Patti when I presented for KONC (Kodaly of North Carolina) a couple years ago. I presented an assessment workshop, and then she presented a really informative technology session for a couple hours. It was from her that I learned about Dropbox and Prezi, two of my favorite programs/ applications! Patti's blog is really comprehensive. I loved this blog about name games:


Patti includes tons of songs and resources (including PDF's of the songs!). Make sure to follow her blog so you can read all of her new entries!

#3: A Jazzy Day
Since getting my Ipad, I'm always excited to find apps that I could use in my classroom. I was very excited to find this on Pinterest!


The app is advertised as an interactive book, but it also has a section in which you can learn about different jazz instruments, as well as a section in which students have to visually and/or aurally identify jazz instruments. So cool! If you project your ipad onto your SMART board or a computer screen, then you could do this with your whole class, but if you don't have that ability, students could do this in learning centers. It is $4.99, but totally worth it. 

#4: Washi tape on Orff instruments
I found this on Pinterest and love this idea!

Five favorite music education pins of September, including tape for Orff instruments, learning center buttons, and more!

So often, kids have a hard time remembering which mallets go with which instrument, so you could wrap washi tape around the mallets and then place the same tape on the instrument. Such an easy and accessible way to remember!

#5: Learning center buttons:
If you like doing learning centers in your music classroom, you might consider buying one of these:

Five favorite music education pins of September, including tape for Orff instruments, learning center buttons, and more!

These buttons allow you to record directions for a center, so that you don't have to repeat the directions when the students get to a specific center. This would work well if you had a center that was a bit more involved, but you were anchored at another center. I found some of these at my local toy store, so you may be able to find them at a store instead of buying them online.

Make sure to click the buttons below to read about the favorite pins of other bloggers! If you want to see more pins like this, make sure to follow me on Pinterest:


Happy pinning and blogging!

Monday, September 9, 2013
Four Ipad apps to help organize your classroom

Four Ipad apps to help organize your classroom


Are you looking for iPad apps to help organize your classroom? Here are four of my favorites!

Ipad apps to organize your classroom: Four great apps for any classroom, to help save time and sort information!


#1: Numbers
This is one of the first apps that the Apple salesman suggested to me after I bought my Ipad. You can view it by clicking on the picture below:


At $9.99, it is one of the pricier apps I've bought, but well worth it. It's a spreadsheet program, and although it's similar to Excel, it seems smoother and more powerful to me. I typed all of my students' names into class lists in Numbers, then added columns for singing solos and other assessments.

Every time a class comes into the room, I open their file in Numbers (I saved each grade level to the same spreadsheet, with different tabs for each class in that grade.) Then, when the students sing a solo, I click on the pop-up menu and choose their grade. Love it!

#2: Smart Seat: 
One of the things I like to do least as a teacher is to create seating charts. I just don't like doing it. So I was VERY excited to find this app!


 The app allows you to type in students' names (I was able to copy and paste the entire list right from Numbers instead of typing each student's name individually...hooray!) Then, the app assigns your students seats. You can change the seating arrangement so there are more or less students in a row and/or more or less rows. I took a few minutes in the first two lessons to take pictures of each student, so when I open up the app, I see all of the students' pictures and names. I knew most of my students already, but it's been very helpful for learning new students' names, and will be very helpful when my student teacher starts in January and she has to quickly learn hundreds of names! Another great feature: you can email each seating chart as a PDF, so you can print it out and add it to your grade book for subs, student teachers, or just for you. I found it very useful the other day, when I was giving an assessment with the "Unlock the Key Pattern" file I mentioned in the last blog entry. I marked the students who were absent right on the seating chart, then marked a minus next to the students who answered incorrectly with each question. At the end of the assessment, I then had data as to who answered all questions correctly (no minuses) and who struggled with identifying rhythmic patterns (several minuses.) Previously, I had just used class lists to mark this information down, so having the visual of the students' name AND their picture made the process go much quicker! I then marked that information into my class lists in Numbers. Oh, and I just read that the newest update will allow you to randomly put students into small groups. Very cool!

#3: Class Dojo
My future student teacher visited my first week of school, and told me about this app. I love it! 


This app allows you to copy and paste the class list from Numbers (again, so much easier than typing every students' name individually!). The app then randomly chooses an avatar for each child, which looks like this:

You do have to enter in the information on the website--not the app--but then it immediately syncs to the app. Then, during class, if you notice someone is participating very well, you could give them a thumbs up that specifies good participation. If a student is disruptive, you can mark that too. The great thing about this is that you can have specific information when doing your behavior and participation grades, instead of just guessing from memory. I'm excited about this quick, fun way to keep record of behavior and participation!

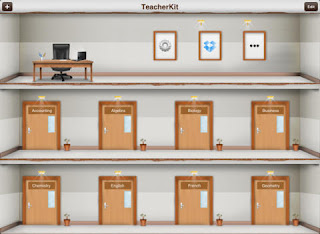
#4: Teacher Kit
I just found out about this app this weekend from my friend Karla, and although I probably won't be using it this year (as I have myself set up with the apps above) I wanted to mention it as another great app.


This app allows you to enter information for each class (each door is a different class) and grades, attendance, and behavior for each class. It also allows you to assign seats. If you want to have all of your information in one app, this would be a great choice! The graphics are great, and the ability to streamline is wonderful. It seems that you do have to enter each students' name individually, though (meaning you can't copy and paste from Numbers, not at least from what I can tell) and I'm not sure you can print the seating charts like you can with Smart Seat. I may just need to play around with it more, though!

What are your favorite apps for organization? Feel free to comment below, and happy teaching!

Music Manipulatives: Popsicle Sticks

Music Manipulatives: Popsicle Sticks

Manipulatives are one of my favorite things to use in the music classroom, so when I heard that Lindsay Jervis from Pursuit of Joyfulness was hosting a linky party about manipulatives, I thought I should contribute! I am writing today about using popsicle sticks for rhythm writing.

Popsicle stick rhythm manipulatives: Blog post includes directions for making and strategies for using!

After my first graders have reviewed the term "rhythm" and have worked with icons, and before they are working with the notation for ta and ti-ti, I have them work with "long" and "short-short,"  notated as ___ and _ _. This is a great intermediate step to getting them to hear 1 sound on a beat and 2 sounds on a beat. Popsicle sticks are a great way to practice this! I make a bag for each student, with 4 laminated hearts in each bag (which you can make with an Ellison die cut or Cricut), and then several regular popsicle sticks and several half-sized popsicle sticks. (As a side note, when I first started teaching, I sat and cut TONS of popsicle sticks with scissors. It was hard work, so I'm glad they now have half-sized sticks!) I just saw some at Hobby Lobby the other day, but you can also get them at Amazon by clicking on the picture below:

I first have students work with popsicle sticks on the board. I find that before individually using manipulatives, having students work with them in a whole group setting can be very beneficial. Magnetic tape, in my opinion, is one of the best inventions ever. Simply tear a piece of tape and place it on the back of a popsicle stick, so students can work with them on the board! You can find magnetic tape by clicking on the picture below:


When working with them in a whole group setting, students can write patterns from songs they know. When students have their own manipulatives, you can have students put out their four heartbeats, then tell them which pattern to write, such as "long long short-short long." This seems like a very easy step, in that you are telling students what to write, but some students really need this intermediary step before dictating completely on their own. It's also great for working on their musical memory!
Then, after telling them a few patterns, you can clap a pattern, have them echo, then have them encode that pattern. This is a great formative assessment; you can see how well students can hear the pattern, and how much more preparation you have to do before you present ta and ti-ti. You can have students spread out in the room, then circulate as you have them dictate. I mark down the students who are absent, then put a minus next to a student's name for each pattern they write incorrectly. If I see several minuses next to a name, I know they still really need individual help. If you are in Ohio and are working on SLO's, this would be a great activity to make sure you are growing each student a year, and really targeting those students who are struggling.
I have also used the popsicle sticks to present ta and ti-ti, by telling a story about how the wind came along and knocked the long so it was standing up tall! We give it the name "ta." Then another wind came along and knocked the shorts so they were standing up tall too...but they didn't have very good posture, so they have to put a book on top of their heads for better posture. (You can add another short popsicle stick to the top to bar the ti-ti's!)

Even better, you can use the popsicle sticks for other rhythms, like rest, ti-tika, etc. You could add a small chip for dotted rhythms!

Thanks Lindsay for hosting the manipulative party! Click the picture below to read her post as well as the posts of others.

Thursday, August 15, 2013
My music room set-up

My music room set-up

I have been so busy preparing my music classroom for the year, I thought I'd share some pictures of my room. I've added quite a few new things this year!

Here are a couple pictures of my room:


Here is one of my bulletin boards. This year, I'll be teaching flute, trumpet, trombone, and recorder, so I added the first fingerings for all of those. I have all of the sets in my TpT store (individual and bundled.)


My other bulletin board will correspond with our school-wide theme "Wild World Tour." Each grade level is focusing on one continent for the year, and for their musical program. When we learn a new song from a specific country/ continent, I can print out that song title and pin it to the board, showing where the song is from.

Here are a couple pictures of my word wall. It shows students how many musical terms they've learned throughout the years! You can find the word wall in my "Bird-Themed Classroom Set":


On Pinterest, I found this idea for creating a school mailbox (the original post is at http://confessionsofamusicteacher.blogspot.jp/2012/09/classroom-tour.html?m=1.) I loved the idea of a classroom mailbox, mostly just to keep me more organized! I found this mailbox at Wal-mart for $10, and I added the "air mail" sign to go with my bird theme. (If you've already bought the bird-themed classroom set, I've added the "air mail" sign; you can simply go to "my purchases" in TpT and re-download.)

 You'll notice the "flat pencils" and "sharp pencils" containers by the mailbox; you can download those for free at http://www.teacherspayteachers.com/Product/Flat-and-Sharp-Pencil-Signs-Freebie-796984.

I used my Cricut machine to create the classroom quote. I love that Cricut machine!

These hand sign/ solfa posters can be found in many of my "songs and activities" melodic sets. A colleague of mine gave me the idea to post "I can" statements by my bulletin boards and classroom signs as a way of reinforcing concepts. I tried to use the "I can" editable statements that come with all of my "I can" sets, but decided they were too small. Because of that, I've added an editable full-sized page to each of the "I can" sets. This one says "I can sing with solfa." (Oh, and the bird is a luggage tag from Thirty-One...I couldn't resist!)


This set was fun to make! The signs are categorized by instrument family, and can be found here: http://www.teacherspayteachers.com/Product/Instrument-Family-Printables-819814


This is a picture of part of my counter. The labels on the drawers are from Deanna Jump's "Organization Station," which is so worth the money, especially if you, like me, sometimes have a hard time getting your drawers organized!


I'm really excited about my musical symbol wall! The arrows are pointing from the musical symbol, to where the symbol is found in an actual piece of music (this example is Haydn's "Surprise Symphony.") You can purchase my "Musical Symbol Set" on TpT; it includes the visuals, the music, and the arrows.


My rules spell MUSIC, which makes them easy to remember! These rules can be found in my "Fabulous First Day" set. These rules are bird-themed, but the set comes with owl-themed, rockstar-themed, and plain.


I was really excited to find this hanging folder system on Pinterest! I often end up just throwing papers in my desk because my file folders are so tightly packed in my desk, they're hard to get into. This will make organizing much easier! This is called a Filetastic, and can be found at http://www.mardel.com/education/organization-and-storage/filetastics.aspx. I also bought the file folders through Mardel. The filetastic is hanging with the help of adhesive hooks.


Since I have a bird theme this year, I changed my "thinking chair" to correspond. When students need time to think (i.e. a time out), they go to the "fell out of the nest" chair, and  when they are ready, they go to the "ready to fly" chair. The "fell out of the nest" visual is in my behavior system in the Bird-Themed Classroom, and I have added "ready to fly" to the set; you can re-download the set to get the visual if you've already purchased it.


What ideas for classroom set-up are you excited about? Feel free to comment below!
Tuesday, August 6, 2013
Creating and Implementing a SLO

Creating and Implementing a SLO


I know it's been a while since I wrote, but I've been busy preparing for the school year! I will be posting pics of my music room soon, but besides preparing my music room and music lessons, I also just finished taking a class about student learning objectives, or SLO's. 

For those of you not in the state of Ohio, legislation was recently passed in which teacher evaluations will be based 50% on observation and 50% on the results of two SLO's. Student learning objectives are plans each teacher writes for a specific concept, estimating adequate yearly growth for each student. We give a pre-test, teach for several months, then give a post-test and compare the data. The geeky part of me is excited to have data to back up what I do in the music room, but I am also nervous the data won't support what I think is going on! It will be an interesting experience for sure!

Fortunately, my district hired a consultant just to give professional development about SLO's. I realize how lucky I am to have taken the class, so here are some insights:

Student Learning Objectives in the Music Classroom: Tips for implementing SLO's in your music room!
  • Be conservative: This was repeated to us a few times throughout the course. Although you may know that your students can achieve amazing things, since this is the first year, and you might not have baseline/ trend data to support your estimates, don't overestimate what your students can do. You can always raise the bar later!
  • Be specific: This really depends on your district, but in my district, they want us to just focus on one indicator/ concept, which I think is great. This makes it so much easier to assess and focus on. For example, instead of focusing on reading rhythm, reading melody, and singing, just focus on reading rhythm. Check with your district, though, because some districts are wanting their teachers to be more comprehensive.
  • Choose a concept new to your students: To really show the greatest amount of growth, choose a concept your students have not learned before. We are lucky as music teachers, because it is more common for students in our class to have no previous knowledge of a concept than in the grade-level classroom, as a student may have been taught multiplication by their parents! I'll give you an example. Last year, I took some baseline/ trend data to prepare for this year. I was teaching my students lines on the treble clef staff (you can read more about how I did this here: http://www.mrsmiraclesmusicroom.com/2013/04/a-new-way-of-teaching-notes-on-treble.html.) After I taught the students the letters in the musical alphabet (and before I showed them any note letters on the staff or taught any silly sentences) I had them complete a pre-test for the lines of the treble clef staff. This seems odd, because of course they weren't going to do all that well--but that's okay, because it will show how much the students learned from the beginning to the end! (I told the students some of them might know what to do because of piano lessons, but if they handed me a blank sheet because they had no idea, that was okay!) The pre-test was a mad minute, in which students had to label as many line notes as possible in sixty seconds, and 70 out of the 88 students answered only 5 or less because it was brand new to them; no students answered over 22 (out of 46) correctly. After a few months of practicing lines, I gave the post-test, which was the same mad minute, and this time, only three students out of 88 answered 5 or less, and 39 students answered over 22 correctly. This was a great amount of growth, but much of it was because unless they had piano lessons, they had never learned about labeling notes on the treble clef before they learned it in my class.
  • Collaborate!: This is the easiest way to write your SLO. I was lucky enough to have another music colleague in the class with me, which helped tremendously!
  • Choose three plans to begin with: This was my colleague Emily's idea. Throughout the course, we were actually able to write five SLO's, and she decided she would choose three to begin with, take the pre-test data, and then decide from the data which one she would eliminate. Since many of us don't have baseline/ trend data from previous years, we don't know how exactly our pre-test data will stack up, so I plan on choosing three as well.
Emily and I wrote five SLO's, for the following: recorder sound production, rhythmic audiation of ta and ti-ti (which can be adapted for later grades and concepts), melodic audiation of "do" (which can be used for later grades and concepts), lines for the treble clef staff, and identifying echo and call/response songs. I think I'm going to take pre-test data for recorder sound production, rhythmic audiation, and lines for the treble clef staff. For which topic are you planning on writing your SLO about? What other questions do you still have?

You can read more about SLO's by clicking on the image below (which is a visual of how SLO's fit into our evaluations):


Looking for more ways to track data in your classroom? Check out this set!


Have any advice for implementing SLO's? Feel free to comment below, and good luck!

SaveSave

latest videos

ON YOUTUBE